Organising LEGION Layers
This procedure describes how to create the CAD layers you will eventually import into LEGION Model Builder from the IFC data. Specifically it describes how to name layers; how to handle small objects in layers; and how to further include or exclude layers from import, simulation and Auto-navigation.
To create LEGION layers:
-
Select one of the available option buttons adjacent to 'Create
layers by:' (depending on the contents of the IFC file, one or more of these
options may be unavailable).
This step instructs LEGION Model Builder to create layers based on IFC's storeys, spaces or zones. Imported layers are automatically named after storeys but if you selected 'IFC Space' or 'IFC Zone' and you would like to name your imported layers by combining storey + space or zone name, select the option 'Story + Space/Zone name'.
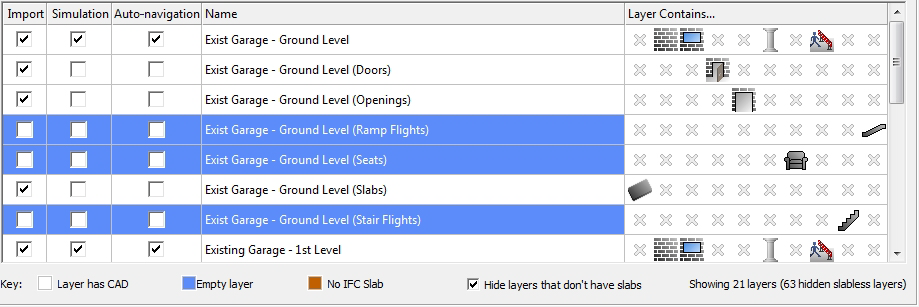
- Next, you can choose to create 'Individual layers for' specified IFC elements (slabs, walls, doors, openings, windows, columns, seats, obstacles, stair flights, and ramp flights). These are represented by the illustrated icons and check boxes (slabs, doors, openings, seats, stairs and ramps are automatically selected). Check or uncheck elements as needed. All checked elements will be imported onto their own LEGION layer; all unchecked elements will be imported onto a common LEGION layer. Layers created for individual elements will have the element type appended to their name, e.g. 'Exit Garage – Ground Level (Doors)'.
-
You can now choose whether to create layers for 'Small objects'.
Small objects are typically anything less than 1.7 metres wide, long, or
across. Small objects do impede Entities, so they should be treated as
obstacles, but they are excluded from Auto-navigation for reasons of efficiency
and performance.
To create layers for small objects, check the box labelled 'Detect small objects, put them on their own layer'.Layers created for small objects will have the element type appended to their name, e.g. 'Exit Garage – Ground Level (Small)'.
Any changes and selections you make are reflected in the central list of layers to be imported:
-
You can now further include or exclude layers from import,
simulation and Auto-navigation To do so, check or uncheck one or more of the
labelled options:
- Import – check this box to import the layer; uncheck to exclude the layer from import.
- Simulation – check this box to include the layer in simulations but not necessarily as part of auto-navigation; uncheck to exclude.
- Auto-navigation – check this box to include the layer in LEGION Model Builder' Auto-navigation calculations (when you check this box, 'Simulation' is also checked); uncheck to exclude.